How to add Google reCAPTCHA to Web3Forms HTML Form for free
This tutorial covers frontend validation and backend validation, with code snippets for you to copy. Web3Forms usually charges for reCAPTCHA to be handled by them and offers hCaptcha for free, which you can explore if you have a Web3Forms account. This tutorial was created as many reCAPTCHA tutorials online miss out the actual backend validation of the reCAPTCHA being completed. For this tutorial, I will use a PHP backend, i.e., one PHP file, on a raw HTML file.
Web3Forms Spam Protection: Why bypass the paywall?
When it comes to form submission spam prevention, Web3Forms offers a great free tier, but it forces a choice: use hCaptcha for free, or pay a premium subscription to handle Google reCAPTCHA natively. If you’ve weighed up Web3Forms reCAPTCHA vs hCaptcha, you already know that while hCaptcha is great, Google's reCAPTCHA v2 is often preferred by clients because users are incredibly familiar with it, leading to less friction on your contact forms.
Instead of forcing your small business clients onto a monthly paid subscription just to block junk mail, we can build our own lightweight shield. By handling the security validation handshake yourself, you get robust Web3Forms spam protection completely for free. Here is exactly how to set it up.
Step 1:
Head to https://www.google.com/recaptcha/admin/create.
Enter any label or project name, and select your reCAPTCHA type.
For domains, add your website domain the form will be on, and if you are working locally, you can list 127.0.0.1, or localhost accordingly.
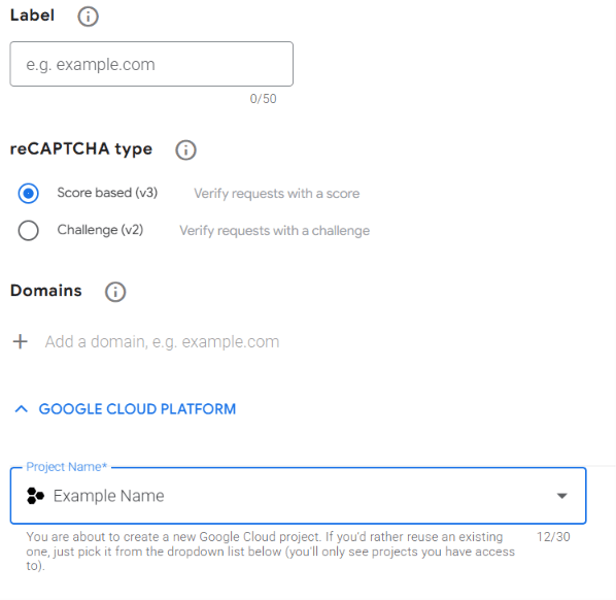
Next, submit and copy your secret and site key or leave this tab open.
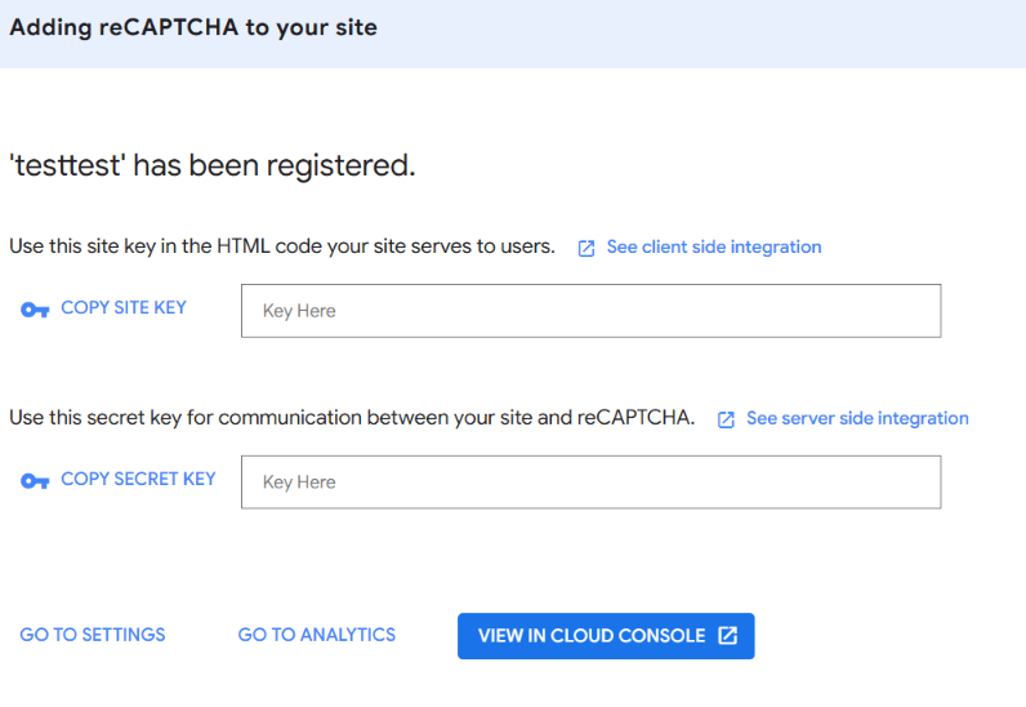
Step 2: Frontend Validation
First, copy this script at the end of your head, before the </head> tag.
<!-- Google reCAPTCHA Script -->
    <script src="https://www.google.com/recaptcha/api.js" async defer></script>
And copy this script and place it before your submit button within your form, replacing YOUR_SITE_KEY with the site key Google gave you:
<!-- The reCAPTCHA Widget -->
    <div class="g-recaptcha" data-sitekey="YOUR_SITE_KEY"></div>
Also make sure your form element has the class
needs-validation like such:
<form class="row needs-validation" novalidate>Now before the end of your body element, right before </body>, copy in this script:
<script>
        (function () {
            'use strict'

            // Fetch all the forms we want to apply the reCAPTCHA validation to
            var forms = document.querySelectorAll('.needs-validation')

        Array.from(forms).forEach(function (form) {
            form.addEventListener('submit', async function (event) {
                event.preventDefault();

                    // Only check if reCAPTCHA is completed
                    var isRecaptchaChecked = grecaptcha.getResponse().length !== 0;

                    if (!isRecaptchaChecked) {
                    event.stopPropagation();
                    alert("Please check the 'I'm not a robot' box before submitting.");
                    return;
                    }

                    // Collect the form data
                    const formData = new FormData(form);

                    try {
                        // Step 2: Send the reCAPTCHA token to process.php for server verification
                    const phpResponse = await fetch('process.php', {
                        method: 'POST',
                        body: formData
                    });

                    const phpResult = await phpResponse.json();

                        if (!phpResult.success) {
                        alert("reCAPTCHA Verification Failed: " + phpResult.message);
                        grecaptcha.reset(); // Make them do the captcha again
                        return; // Halt, do NOT send to Web3Forms
                        }

                    // Now the captcha has been validated, the captcha information is removed from the payload to stop Web3Forms from attempting its own validation, activating a paywall block as a free user
                    formData.delete('g-recaptcha-response');

                        // Step 3: Server says human! Now submit directly to Web3Forms
                    const web3Response = await fetch('https://api.web3forms.com/submit', {
                        method: 'POST',
                        body: formData
                    });

                    const web3Result = await web3Response.json();

                        if (web3Response.status === 200) {
                        alert("Form submitted successfully!");
                        form.reset(); // Clear all fields
                        grecaptcha.reset(); // Reset the captcha checkbox
                        } else {
                        alert("Web3Forms Error: " + web3Result.message);
                        }

                    } catch (error) {
                    console.error("Error:", error);
                    alert("An error occurred while processing your request.");
                    }
                }, false)
            })
        })()
    </script>
This will stop the form being sent if the captcha has not been checked, and calls for the process.php file we are about to add, which will check that the captcha was completed properly by the user.
Step 3: Backend Script
Now create a file named process.php which will take the captcha status, send it to Google and return its validation status.
Copy the following code into this new file, and replace YOUR_SECRET_KEY with your secret key given to you by Google:
<?php
    header('Content-Type: application/json');

    if ($_SERVER['REQUEST_METHOD'] === 'POST') {
        // Google Secret Key reCAPTCHA
        $secretKey = "YOUR_SECRET_KEY";
        $responseToken = $_POST['g-recaptcha-response'] ?? '';

        if (empty($responseToken)) {
            echo json_encode(['success' => false, 'message' => 'Please complete the reCAPTCHA challenge.']);
            exit;
        }

        // Verify token with Google
        $verifyUrl = "https://www.google.com/recaptcha/api/siteverify";
        $chVerify = curl_init($verifyUrl);
        curl_setopt($chVerify, CURLOPT_RETURNTRANSFER, true);
        curl_setopt($chVerify, CURLOPT_POST, true);
        curl_setopt($chVerify, CURLOPT_POSTFIELDS, http_build_query([
            'secret' => $secretKey,
            'response' => $responseToken,
            'remoteip' => $_SERVER['REMOTE_ADDR']
        ]));

        $verifyResponse = curl_exec($chVerify);
        curl_close($chVerify);

        $responseData = json_decode($verifyResponse);

        // Tell JavaScript if Google approved it or not
        if ($responseData && isset($responseData->success) && $responseData->success) {
            echo json_encode(['success' => true]);
        } else {
            echo json_encode(['success' => false, 'message' => 'Google verification failed.']);
        }
        exit;

    } else {
        header("HTTP/1.1 403 Forbidden");
        echo json_encode(['success' => false, 'message' => 'Access Denied.']);
    }
    ?>
Finished
This tutorial was brought to you by DunDaly Design, if you need a website built for you just press contact.
- TL;DR: Bypass Web3Forms' paid reCAPTCHA layer by running a quick frontend & backend check via your own free PHP script!